If you want to shine your dressing room or makeup room with a Hollywood vanity mirror, there’s nothing wrong with it. This elegant piece will add a heavenly shine to your room. Buying a complete Hollywood vanity mirror will cost you much and may go beyond your ability.

To cut the big cost, you can make your own vanity mirror where you can choose your color, size, and lights. So, are you curious now about how to make a Hollywood vanity mirror? It’s not rocket science. You can make your own by yourself and you will be proud, trust me!
It is so easy if you follow a few tricks. All you need to collect the materials for mirrors such as mirror glass, lights, color, etc. and organize them in a particular step. To mitigate your curiosity, you can go through the following steps. These steps will lead you to your dream furniture.
Step 1: Collect the Materials
Collecting materials is the first step in making any product. For a Hollywood Vanity Mirror, you need three main ingredients; a frameless mirror, plywood, and light bulbs.
You can get a medium to large size mirror. The mirror size depends on the place where you want to keep it. Measure that area to find out the possible size of the mirror. An average size maybe 30″ x 40″ mirror.
You can buy this frameless mirror from any local home goods store and cut it at your desire dimension. It is a good option to get it from any local mirror shop if you don’t find it at online stores. You can always purchase a ready mirror such as Better Bevel 30″ x 40″ Frameless Rectangle Mirror if you want to avoid the cutting process.
For the settlement of light bulbs, you may have to collect wires, adaptor, dimmer, and 3 prong replacement plugs. I am not much experienced at electricians’ job, so I prefer a complete light kit like Led Vanity Mirror Lights Kits, Hollywood Makeup Mirror Lights with 14 Dimmable RGB Light Bulbs, Lighting Fixture Strip. You can work easily with this trendy kit.
Step 2: Get Your Tools

After collecting your materials for vanity mirror you need to get some tools required for setting this mirror. Hand saw, painters’ tape, measuring tape, brown craft paper, screws, and paint are all you need. You will get them at any hardware shop.
For plywood and glass, you can buy a multipurpose spray paint can of any color that will suit your décor. Almond color maybe it. You can buy Rust-Oleum 249125 Painter’s Touch Multi-Purpose Spray Paint, 12-Ounce, Almond. This will color both the wood and glass nicely.
Step 3: Make the Backside of the Vanity Mirror
Get a big piece of half-inch plywood. If you don’t find a large piece of plywood you can buy one that gets close to the measurement such as 3/4″ (18MM) 30″ x 48″ Baltic Birch Plywood b/bb Grade one Clear face or you can buy two sheets of medium-sized plywood and attach them with screws.
Lay your frameless mirror down on this plywood sheet. Cut around the mirror with a table saw so that you can get the backside frame of the mirror. Cut a piece of plywood of 40” x 4” and two pieces of 4” x 29.5”. Attach them to the large backside piece of plywood with screws. This will create a three-sided box.
Check: Conair Round Shaped Wall Mount Mirror
Step 4: Paint Your Color

Coloring is one of the principal parts. You can choose your color that matches your room environment. Almond color will be perfect as I said before, I guess. Paint the plywood box with the multi-purpose spray paint. This will give your mirror background a soothing color.
You also can ignore coloring the whole mirror background. Instead, you can paint only the three-sided part that will be visible, to save your paint. Saving is always a good thing, right?
A colorful frame around the mirror gives it a classy look. You can place your lights on this frame. So, measure the border with a measuring tape around the mirror and mark it with a mirror safe marker. You can have your depth for a frame. 4 inches will be perfect to place the bulbs.
To paint this part safely, cover the inside of the mirror with a brown paper and tape it accordingly so that there is no exposed area. Then take your mirror to an open place with a good ventilation system and spray the exposed frame carefully. Maintain a minimum distance of one foot from the mirror and continue spraying until entirely covered.
This will take a while. When you are satisfied with the color that there is no blank space left and it is evenly covered, you can stop spraying. Give it some time to dry. After that you can remove the tape as well as brown paper and here is your mirror with the glazing border!
Step 5: Mount the Mirror
Mount the mirror on the backside frame with mirror clips or mounting hardware such as Shappy 2 Sets (8 Pieces) Spring Loaded Mirror Hanger Clips Set Unframed Mirror Mount Clips with Rawl Plugs and Screws. This way your mirror will be secured with the frame and won’t be slippery when you will place it on your glossy desk.
Step 6: Wire Your LED Lights
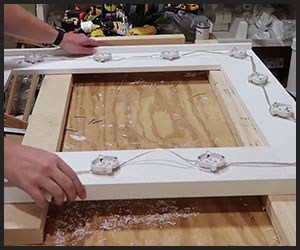
Lorem ipsum dolor sit amet, consectetur adipiscing elit. Ut elit tellus, luctus nec ullamcorper mattis, pulvinar dapibus leo.
Step 7: Place it on a Desk
Your Hollywood style vanity mirror is now ready to use. Put this on a desk where you want to place it and this classy piece is ready to serve you.
Final Words
Now that you know how to make a Hollywood vanity mirror with lights, you can build your own mirror with a moderate cost and polished view. It is a fun project as well as will surely be a great birthday or anniversary gift for your wife or daughter. So, stop thinking and wasting your time and start planning on making one! Let me know your experience with this project.
Sources
- BeautyWithTy, HOW TO: Build your own Hollywood Vanity Mirror W/Lights EASY AND AFFORDABLE, Sep 24, 2016

- About the Author
- Latest Posts

Lily is the Editor-in-Chief and one of the writers here on InStraight and ThoseGRACES.com. Growing up with thick hair that has a mind of its own, she’s always been passionate about finding the gentlest yet most effective products to help tame her wild mane. You can find more about her HERE. FOLLOW HER on FACEBOOK.
